Monday, April 30, 2012

I Love Spring

Monday, April 30, 2012
I love spring. I love waking up early in the morning with the sun streaming in the window. I love the new bright leaves, and little young blossoms, and the green everywhere!  I love the smell of the flowers and the sounds of the birds. I love the warm breezes. There is so much new life and so much joy! Just the word spring makes me take in a deep breath. So fresh and new. 
So much potential, right around the corner!


I took some photos of a small bunch of tulips. I'm playing around with a new lens the hubby got me as an "early birthday present." I love how it captures the details in such a soft way. It may seem silly, but I watermarked the photos. Photography is a wonderful hobby for me, but who knows... maybe it will become more, someday. I'm learning, and I have so much more to learn. Just like medicine... always learning, always growing. Like spring, photography and medicine are full of life and joy for me!


I was asked by a friend to photograph her wedding this summer. She said that they were just planning on having friends snap some photos with their camera phones. I said, "Umm, no. No phones. I will gladly do my best to capture your day!" Since I won't have much time to practice between her wedding and my medical school boards, I squeeze in a little practice during my study breaks... hence, the ring shots, below. 


Also, I love my engagement (wedding) ring. I love love love it!

Looking forward to more SPRING! And now, back to studying pulmonology...


Wednesday, April 25, 2012

DIY Fabric Map Art

Wednesday, April 25, 2012
I love thinking about home. For me, home is Seattle, Washington, but for now, the hubby and I are enjoying our time living in Albany, NY while I attend medical school. NY is the first state I've truly lived  in, other than Washington. I grew up outside of Seattle, went to college at the University of Washington {Go Huskies!}, got married in Washington, and lived there for the first two years of married life. Then came the acceptance to Albany Medical College and the Great Road Trip of 2010. We are loving life on the East Coast!


Thinking about my two states of residence, I decided to make a little "map art." Map art is all over Pinterest and blog land, but I figured I'd try my hand at making it personal. :)


I started with some map outlines from here. I printed them onto regular printer paper and cut them out. Then, I traced them onto some canvas fabric, and cut them out. Next, I lit a nice tall candle and burned the edges of the fabric. {Note: fabric is often flammable... I had a glass of water ready to dip my canvas in if flames became uncontrollable.} 

I figured that since my lines weren't perfect (it's kind of difficult when both states have islands), I could make it look more intentional with some fire. Plus, I like fire. It reminds me of campfires and s'mores and singing songs with my dad playing guitar in the summer. It reminds me of Christmas and being cozy in the winter.

Fire reminds me of home.


After singeing the edges of my two state cutouts, I laid them on a piece of burlap and placed the burlap + maps into this awesome frame from the Christmas Tree Shops that I painted and distressed. 


There you go! My map art of home. I will probably make some changes over the next few weeks, but I like it for now. :)


Monday, April 16, 2012

Mini Flower Boxes

Monday, April 16, 2012

While browsing the Christmas Tree Shops the other day, I came across these little storage boxes for keys. 


I don't know about you, but being a twenty-something medical student, I don't have nearly enough keys to warrant a special storage box just for them. However, I couldn't pass up the $1.99 find, and I figured something crafty would come to mind. Well, it did - mini flower boxes! 


To start, I carefully sanded off the letters.


Next, I cut out a few of my new favorite Graphics Fairy images. Using the mod podge transfer method, I mod podged the images onto the boxes and let them dry for a few hours.


Then I carefully sliced through each image where the box opened so that I could open the box. Next, I used a wet paper towel and rubbed off the paper so that just the toner image was left.


Here they are! So cute, right?


Since I wanted to use these particular boxes to hold some little cacti that I purchased at Lowes, I carefully removed the glass from inside the top of the lid. Then I used wood glue to seal the lid to the box so that no soil would leak out.


I put some small stones on the bottom before I added the plants and soil, hoping that it helps a little with the lack of drainage since these will be inside boxes.


There you go! Personalized mini flower boxes!


Linking up at


Friday, April 13, 2012

Shrimp Spring Rolls

Friday, April 13, 2012
Between college and medical school, I worked as a nurses assistant in the NICU at the University of Washington Medical Center. While learning a ton about medicine and life, I worked with some fantastic nurses who shared with me their love for Vietnamese food. Once a week, we had what we called "VSD" - Vietnamese Sandwich Day. We ordered food from this amazing little Vietnamese restaurant in the U-district called Thanh Vi.


I got slightly addicted to their #3 (shrimp spring rolls), as well as their chicken pho and tasty sandwiches. One day at lunch, my nurse friend, Heidi, taught me how to make them for myself! Modifying a few different recipes and using her special spring roll techniques, I have come up with a delicious spring roll recipe that the hubby and I love!


The recipe and steps are below. While the process takes some practice and trial and error to perfect your own technique, these little rolls are totally worth it!

Ingredients:

Noodles:
Half a package of rice noodles, cooked
1/3 cup chopped fresh Thai basil
1/4 cup chopped chopped fresh mint
1/4 cup chopped fresh cilantro
1 medium carrot, diced or julienned
1 serrano pepper, seeds removed, finely diced (wash your hands afterwards - it's spicy!)
1 tsp minced garlic
2 Tablespoons sweet chili sauce
2 Tablespoons fish sauce
2 Tablespoons hoisin sauce
1 Tablespoon lime juice
Sriracha - to taste


Spring Rolls:
Spring roll wraps
Cooked shrimp, halved lengthwise (each roll takes 2 whole shrimp, or 4 halves)
Bean sprouts
Iceberg lettuce leaves, washed, torn into pieces about the size of a deck of cards
Noodle mixture
1 plate with warm water
1 wet paper towel 

Dipping Sauce: (feel free to change amounts/ingredients to suit your taste)
1 Tablespoon of peanut butter (either creamy or chunky)
2 Tablespoons of hoisin sauce
1 Tablespoon sweet chili sauce
1 teaspoon fish sauce
1 teaspoon white vinegar
1 teaspoon onion powder
Srirarcha - to taste
(Mix all ingredients together)

Steps
  1. Place one wrap into the water on the plate to soften it. Make sure the entire paper is covered. Let it sit for about 5 seconds in the water. When you take it out, the wrap should still be a little stiff so that it doesn't fold on itself.
  2. Take the wrap out and place it on the wet paper towel.
  3. Layer 4 shrimp halves onto the wrap, about 1/3 of the way up from the bottom of the wrap

                                             
  4. Place a handful of the noodle mixture on top of the shrimp

                                           
  5. Place a few bean sprouts on top of the noodles

                                           
  6. Layer a few pieces of lettuce to cover the entire little pile

                                          
  7. Roll the wrap: fold the bottom edge of the wrap up to cover the lettuce, and carefully roll the wrap away from you. Fold the two side edges in before closing the wrap

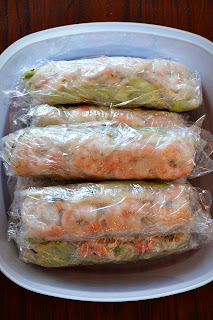
The wraps will keep for a couple of days in the fridge if you wrap them in saran wrap and store them in a Tupperware container.


Hope you enjoy these tasty little spring rolls! Here is the recipe as a JPEG to print:


Linking up at
Alderberry Hill

Monday, April 2, 2012

Turn Your Eyes...
Monday, April 2, 2012
This song has been on my heart all day. It is such a sweet reminder of what really matters in this life, and helps me keep things in perspective. May you have a blessed Holy Week as we prepare for Easter on Sunday!


Feel free to print this little graphic I made :)

Feel free to use the images that I create for your own projects, just link back to my original blog post. Thanks!

I printed the words alone on burlap and attached it to a 3x3 canvas. 

I used Heat'n Bond iron-on adhesive, and attached the burlap onto printer paper so I could print directly onto the burlap without the printer getting jammed. Then I used a wet paper towel to remove most of the printer paper backing so that the burlap would wrap around the canvas better. Lastly, I wrapped and stapled the burlap onto the back of the canvas.


The PNG file is below if you would like to do the same!


Related Posts Plugin for WordPress, Blogger...